Saturday, February 25, 2012

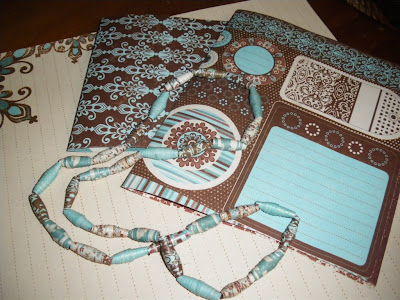
Necklace out of Scrapbook paper

You have probably all seen the lovely coloured necklaces around that have been made with various assortments of paper rolled up and sprayed with clear varnish.

On Pinterest last week I came across a tutorial with the template cutouts to make these necklaces so thought I'd give it a go. You can follow the tutorial from here.

Here are my photos of making them.

Above: These are the papers I chose
Oops forgot a photo of the actual pattern and rolling!
Above and below: The rolled beads on skewers.

 Above: I placed them into a florists oasis to spray with the clear varnish
Above: All finished
Above: The necklace is now at home amongst my other necklaces and scarves
I quite enjoyed making them. I made mine with the first pattern of the templates but made them a bit longer than what appears  here. 

Perhaps you could give it a try for a weekend project.


Saturday, February 18, 2012

Baked not fried Spring Rolls

I discovered via a blog some months back that you could oven bake spring rolls. I had always thought spring rolls needed to be deep fried, hence I never made them!

Since that discovery spring rolls have been served up every few weeks at our house. The first time I made them I found a fairly traditional recipe for the mix, but now I just make up a mix of whatever I like.

I fry up whatever minced meat I desire (pork, chicken, beef) and slice or grate up finely whatever vegetable I want and add seasonings and stock to taste. This is very vague but I do just make it up as I go. Allow the mix to cool and drain any excess fluid before placing on the pastry to roll up.I just place a little oil on the edge of the pastry to seal it. No need to brush the rest of the rolls, just pop them in a moderate oven until crispy.

These photos aren't very good, but it was my record of making them at the time.


I have been enjoying building my boards in Pinterest with those things that interest me and my favourite find for the week would be this crotched bag.

 
I am quite keen to give this a go. The tutorial can be found here.

Remember if you would like an invite from Pinterest to start creating your virtual pinup boards, just ask and I'll send you one. It's much quicker than just requesting one from the Pinterest site where you will have to wait up to a week to get started.


Saturday, February 11, 2012

Pinterest....I'm addicted!!

Over the last week, my evenings have been spent discovering Pinterest! You may have heard or seen links to it of late and wondered what all the fuss was about, like me.

It is a place where you can create virtual pinup boards in your space and add, like, comment, follow and pin all the things that you see on the net or within the Pinterest community that interests you. You create 'boards' with categories that best describe what you want to put in them..eg. Food, Creative Ideas... You can view my boards here http://pinterest.com/nettii62 - If you aren't signed up with Pinterest you can only click on the images and view...once you are signed up you can then do all the fun stuff.

I can 'Invite' you....Without an invite you can only view all the eye candy.
As I didn't know anyone with a Pinterest account I clicked on  Pinteret's 'invite' button and waited around a week before I could start the fun. As I'm now a member I can now invite you so you can get started straight away. Just email me or leave a comment if you would like an invite.

Blogging vs Pinterest...Pinterest won't take over the blogging world. I've discovered that even though you can 'like', 'pin' and 'comment' on people's images you don't have the personal communication like you do on blogs.

Here are some things that I have found and placed in some of my boards so I can easily refer back to them.

In my 'Drawn to Pink' board


In my 'Food' board

Source: glamour.com via Annette on Pinterest


In my 'Clever Ideas/Things to make' board


To 'pin' an image from a blog or website you install a 'pin it' button which sits in your browsers toolbar. If you see something you like and want to add it to one of your boards you click on the 'pin it' button and the images from that sites page will come up. You choose which photo you want and a pop up window all bring up the list of your boards, you simply choose which board to place the photo into. The 'pin it' button will automatically save the website address of which that image came. So in your board if you pin a tutorial, you just click through and you come to the website of which the image came.

Important...if you want to pin an image on a blog, make sure you click into the appropriate 'post' where that image comes from. If you don't the people might have to wade through a whole lot of posts before coming to what they are wanting...frustrating. I learnt this by mistake and had to go back and re-do my links.


If you want to learn more I found this beginners tutorial quite good http://www.sortacrunchy.net/sortacrunchy/2011/05/pinterest-a-beginners-guide.html

If you have any questions or want to receive an immediate invite, please comment or email me and I'll forward you one so you can get started. WARNING....It is addictive!


Friday, February 10, 2012

61 years of marriage!

My Mum and Dad celebrate their 61st Wedding Anniversary today...wow what an effort!
The have 6 daughters, son in laws, 10 grand children and 6 great granchildren.

The below photo was taken at Christmas time.


Thursday, February 9, 2012

Parcel in the post

While perusing through the Ezibuy catalogue recently I came across a Deborah Hutton throw rug that was drastically reduced in price. I'm a bit of a sucker for throw rugs so hopped on the net and ordered it.

It arrived a couple of days ago.
I love it!  It's so soft and the knitted cable running through it is just beautiful. Another throw to add to my ever growing collection!
Last night I made baked potatoes which I hadn't made in ages. I rolled up the potatoes in alfoil and popped in the oven for around an hour. You can do them in the microwave wrapped in gladwrap with holes poked in the gladwrap.
 I then fried up some bacon, capsicum, tomatoes and mushrooms.

I plated them up.

Then topped with cheese, and put the plate in the microwave for around a minute to melt the cheese and then topped with sour cream and chives.
It was delicious and very filling!


Related Posts Plugin for WordPress, Blogger...